Thursday, March 20, 2008

Screen Bottom Boards

In today's post, I'll be elaborating on the screen bottom board I mentioned previously.

As I have said before, a normal bottom board functions as a base for the hive to keep it off of the ground, and looks like this:

A screen bottom board is basically the same thing, except there is a hole cut in the middle of it, and a screen stapled over that hole. This is what a completed sreen bottom board looks like:


The major advantages to having a screen bottom board are improved ventilation, and defense against the Varroa Mite.

The Varroa Mite (also called Varroa Destructor) is one of the major pests to modern beekeepers. Mites suck the "blood" of adult bees, leaving open wounds which makes the afflicted bees more prone to infection. The Varroa Mite reproduces on a 10 day cycle. In the first stage, the female mite enters a honey bee brood cell, once the cell is capped, the mite lays eggs on the bee larva. The mite eggs hatch around the same time that the young bee emerges, the young mites leave the cell with the host bee, and then spread to other bees and cells.

This is what Varroa Mites look like on a bee pupa (developing bee) The screen bottom board aids in Varroa control, because when the mites fall off of a bee in a hive with a normal bottom board, it can crawl to another bee or brood cell. With a screen bottom board, the mites that fall from bees will fall to the ground, and die.

Labels: , ,

Sunday, February 24, 2008

Finished!

As of today, I am now finished with all of the assembling, oiling, and painting accociated with the building of a new hive! Since my last post I have:

Painted the hive body

Painted the bottom boards

Modified the bottom boards to become screen bottom boards

Assembled 2 honey supers

Painted 2 honey supers

Assembled 20 frames to go in the honey supers

Assembled the inner and outer covers

Oiled and painted the inner and outer covers

And nailed a metal cover onto the outer cover.


Tomorrow, I'll be dropping off my hive (with 8 frames) to have bees put in them. I'll be picking it up in April, when they are full of bees!

Wednesday, February 6, 2008

Hive Pieces

Here is what I have assembled so far:


The Hive Body:


Ten of these frames:


And the Bottom Board:


Here is what the hive will look like with frames in it:


Also, in response to a comment, I have had to put 324 nails in so far.


In other news, I now have a gallery for bee pictures!
Link!


Does this post satisfy the need for pictures?

Tuesday, February 5, 2008

Assembly

At my class on the 2nd, I got all of the pieces to build my hives. I will have to assemble 10 frames and the brood box before the March class. In addition, all of the wooden pieces, excepting the frames, will need to have a coat of linseed oil (to help prevent decay) and 2 coats of paint put on. So far, we have assembled the frames and the brood box, and put oil on the box. I'll be updating soon with pictures.

Next weekend, I'll be putting the first coat of paint on. After that I'll need 1 more coat of paint, and the hive will be ready to put bees in!

Sunday, January 27, 2008

Parts of a beehive

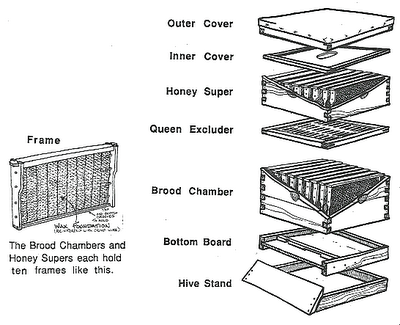
Yesterday was my first class, and I think it went well. Among other things, the coordinator explained the parts of the hive, which consist of:


An outer cover, which is, simply put, a lid.

An inner cover, that acts as a spacer between the outer cover and the main part of the hive.

Honey supers, which are boxes that each have 10 "frames" that bees will put nectar, and later honey on.

A queen excluder, which keeps the queen bee in the lower part of the hive.

The brood box(es), which is the part of the hive that the queen lives in, and where she lays her eggs, also known as brood.

The bottom board, that is a base that the other parts rest on

And the hive stand, which serves to keep the hive off of the ground.


I also ordered my 2 hives yesterday, I'll get them next week at class. Once I get them, they will need to be assembled and painted, and returned at the march class. After I give the hives to the coordinator, they will put 4 of my frames from each empty hive into an active beehive. The queen of that existing hive will lay eggs on my frames, and in April, those frames will be put back in my hive. Those frames are going to be the beginning of my new hives.

Friday, January 25, 2008

Tomorrow...

My name is Sam Hatch, I'm 15 years old and a soon-to-be beekeeper. The Collin County Hobby Beekeeper's Association gave me a scholarship that includes a beehive as well as several classes to teach me about bees. My first class is tomorrow, and in April I will be getting my hive. At the class tomorrow, we will order my safety equipment. The gear that will keep bees from stinging me consists of a hat with veil, a pair of gloves and a smoker (to calm the bees). I'll also be getting a hive tool, which is like a small crowbar used for opening the hive, which I'll be talking about later.


I'll be using this blog to chronicle my metaphorical bee journey, and to tell (some of) the world about bees. In the next few weeks, I'll be reading First Lessons in Beekeeping, by Keith Delaplane. This is the standard book for most new beekeepers in the area. The book will teach me about the anatomy of a bee, all about the hive, when the best time to harvest honey is, and the habitat needs of bees.

Look forward to my next post!

Labels: